
How to Resolve the WordPress PHP Memory Limit Error
Fix WordPress “Memory Exhausted” Error by Increasing PHP Memory Limit
Occasionally, you might encounter an error indicating that you’ve hit your site’s “PHP memory limit”. This can be confusing, especially if you’re unsure of the cause or solution. Fortunately, this is one of the simplest issues to resolve, even for relatively new WordPress users.
In this guide, we’ll explain what a WordPress memory limit error is, why it might occur on your site, and how to fix it. While WordPress is generally a stable platform, it’s not immune to errors. Common issues include the infamous ‘White Screen of Death’ or a site stuck in ‘maintenance mode’.
The good news is that WordPress errors are usually not too difficult to troubleshoot and fix. This can be intimidating to newcomers since errors often provide little information about the problem and how to resolve it. One of the most frequently encountered issues is the WordPress memory limit error, also known as a “PHP memory limit error”, which typically looks like this:
fatal error: allowed memory size of ____ bytes exhausted
Memory limit errors can occur under various circumstances. They are most likely to arise when you perform specific actions on your site, such as installing and activating a new theme or plugin, uploading images and other media, or migrating your website from one server to another.
If you encounter this error on your WordPress site, don’t worry. The causes are straightforward. Let’s review them to understand why this issue occurs.
Why You’re Seeing a WordPress Memory Limit Error on Your Site
The cause of the “memory limit” error is hinted at in the name. Your website requires a certain amount of memory to store its data, including the database, files, content, and code added by plugins and themes.
This memory is provided by your hosting server. When you purchase a hosting plan, your site is allocated a specific amount of resources, including memory, to ensure it functions smoothly for visitors.
Higher-tier hosting plans offer more space and memory for your website. Many first-time site owners start with basic shared hosting plans, which provide limited memory. As your site grows or you use more complex plugins and scripts, you may eventually reach your memory limit.
In WordPress, this results in a PHP memory limit error, preventing you from completing certain actions.
How to Check Your Current PHP Memory Limit
If you’re running WordPress 5.2 or above, you can use the Site Health tool to check your current PHP memory limit. In your WordPress dashboard, go to “Tools” → “Site Health” → “Info” and scroll down to the server section. Here, you can see the PHP memory limit on your server.

If the amount is low, say 32M, there’s ultimately only one fix for this issue: you need to increase the amount of memory allocated to your site.
How to Resolve the WordPress Memory Limit Error
The WordPress memory limit error is straightforward to troubleshoot due to its clear cause. To fix this issue, you can increase the memory allocated to your website. Follow the steps below to resolve the problem.
Increase the PHP Memory Allocated to Your Website
If your site has run out of memory, the simplest solution is to increase its memory allocation. The extent to which you can increase this limit depends on your hosting provider and plan. Often, your site may be using less memory than what is actually available.
Your site’s current memory limit is set in the wp-config.php file, which may not match the limit allowed by your provider. Therefore, the first step is to try increasing your PHP memory allowance by editing this file.
Using an FTP Client or cPanel File Manager to Access Your Site’s Files
To increase your site’s memory limit, you’ll need to log into your site directly using Secure File Transfer Protocol (SFTP) or access your File Manager via cPanel.
For FTP: If you haven’t done this before, you’ll need to install an SFTP client, a program that enables you to connect to your site’s server files. Alternatively, you can access your files via your hosting account’s cPanel “File Manager.”
We recommend using FileZilla, which is free and easy to get started with. Follow this guide to set up FileZilla and make a connection. You’ll need your site’s SFTP credentials, typically found in your hosting account. If you encounter any issues, your hosting provider can help you locate your credentials.
Finding Your wp-config.php File
Once you have FileZilla set up and connected, or if you are accessing your files via cPanel “File Manager,” you should see a screen similar to the following:

In the top-right quadrant, you’ll see a list of folders containing your site’s files. Locate your site’s ‘root’ folder, which is often named after your site’s domain or labeled as public_html or www. Open this folder and look for a file named wp-config.php:
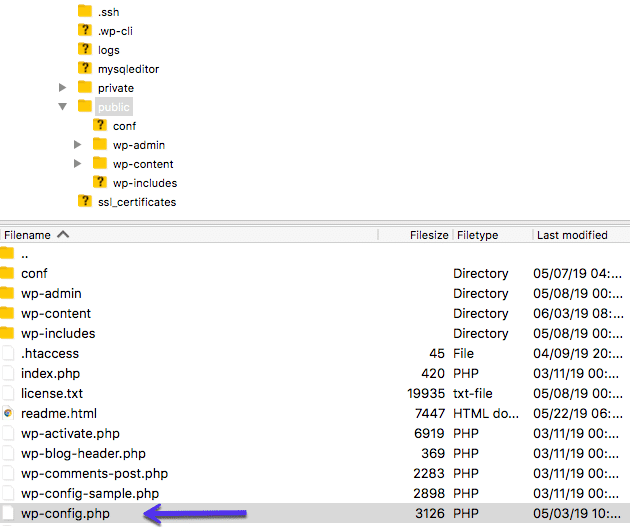
This file contains important information about your site’s database and settings, so it’s crucial to avoid altering anything other than the specific line of code we’ll be addressing. In fact, it’s wise to back up your site before proceeding, to safeguard against accidentally deleting or changing critical data.
Increasing Your Site’s Memory Limit
With your backup ready, open your wp-config.php file. It should look something like this:
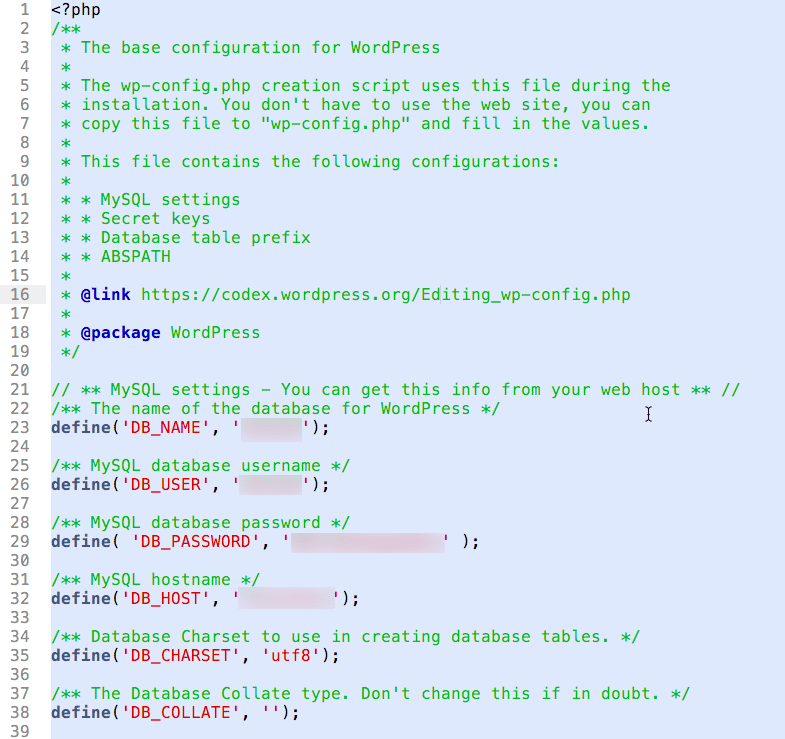
Then, look through the file for the following line:
define( 'WP_MEMORY_LIMIT', '256M' );
Note that the number in your file may differ, as it represents your site’s current memory limit. You might not find this line at all.
If you locate the line, increase the number it contains. In most cases, 256 MB should be sufficient. If the line is missing, paste it in just before the part of the file that reads: “That’s all, stop editing! Happy blogging.”
Save the changes to your wp-config.php file and close FileZilla or your hosting File Manager. Open your site and retry the action that triggered the WordPress memory limit error. If the error no longer appears, you’ve resolved the issue.
If the error persists, open your wp-config.php file again and increase the memory limit further. If repeated attempts fail, you may have reached the maximum limit allowed by your hosting provider, necessitating a different approach.
Note: Some hosts may not allow access to your site through an FTP client. In this scenario, you can often change your memory limit manually using cPanel.