How to Fix WordPress Posts Returning 404 Error (Step by Step)

Method 2: Fix Your Permalink Settings
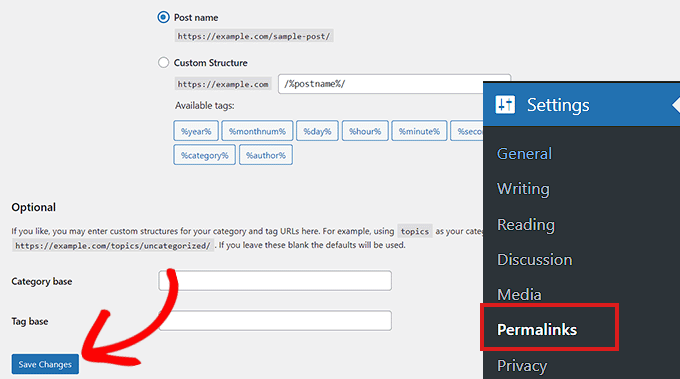
WordPress posts may return 404 errors due to issues with the rewrite rules in your .htaccess file. Usually, you can resolve this by simply updating your permalink settings.
To do this, go to Settings » Permalinks in your WordPress admin and click the ‘Save Changes’ button. You don’t need to alter the permalink structure—just saving will refresh your settings and clear the rewrite rules.
This method often resolves the 404 error for WordPress posts. However, if the problem persists, you may need to manually update your .htaccess file.

Method 3: Update the WordPress .htaccess File
Before you begin, ensure you back up your WordPress .htaccess file. This way, if anything goes wrong, you can easily restore the original file.
Next, connect to your server using an FTP client like FileZilla or the File Manager in your WordPress hosting dashboard.
Locate the .htaccess file, which is found in the same directory as folders like /wp-content/ and /wp-includes/.
Right-click on the file and choose ‘File permissions.’
To make the file writable, change its permissions to 666 by entering ‘666’ in the ‘Numeric value’ box, then click ‘OK.’
After that, follow the steps from the first method in this tutorial. Once you’re done, remember to change the permissions back to 660.
You can also edit the file to add custom code. Simply open the .htaccess file with a text editor and insert the following code:
# BEGIN WordPress
<IfModule mod_rewrite.c>
RewriteEngine On
RewriteBase /
RewriteRule ^index\.php$ - [L]
RewriteCond %{REQUEST_FILENAME} !-f
RewriteCond %{REQUEST_FILENAME} !-d
RewriteRule . /index.php [L]
</IfModule>
# END WordPress
Method 4: Contact Your Hosting Provider
If the solutions above haven’t resolved the WordPress posts returning 404 error, it’s a good idea to reach out to your WordPress hosting provider. The issue might be on their end, or they could assist you in troubleshooting the problem.
Additionally, check out our guide on how to effectively request WordPress support and receive help.
Method 5: Fix WordPress Posts Returning 404 Error on Local Servers
If you’re using a local server for testing, you’ll need to enable mod_rewrite in the Apache configuration of your MAMP, WAMP, or XAMPP setup.
This will allow WordPress to create clean URLs and prevent 404 errors for posts and pages on your local server.
The process varies depending on the platform you’re using. For XAMPP users, open the control panel and click the ‘Config’ button under Actions. Then, select ‘Apache (httpd.conf).’
Find the line #LoadModule rewrite_module modules/mod_rewrite.so and remove the ‘#’ to uncomment it, enabling mod_rewrite.
Next, locate all instances of AllowOverride None and change them to AllowOverride All.
Setting it to ‘All’ allows all directives to be overridden. Save the httpd.conf file and close it. Then, in the XAMPP control panel, click ‘Stop’ on the Apache module, and ‘Start’ again to restart it.
Finally, return to your WordPress admin dashboard to check if your permalinks are working properly.

