How to Fix Internal Server Error.
Clear WordPress and Browser Cache
Browsers and WordPress caching plugins may sometimes accidentally store a cached version of an error page.
To fix this, start by clearing your browser cache. Then, if you have access to your WordPress admin area, navigate to your caching plugin’s settings page and clear the WordPress cache there.
For more details, check out our tutorial on how to clear the WordPress cache.
Checking for a Corrupt .htaccess File
The .htaccess file is a server configuration file that WordPress also uses for setting up redirects. A common cause of internal server errors is a corrupt .htaccess file.
To fix this, visit the Settings » Permalinks page in your WordPress admin area and click the Save Changes button without making any modifications. This action prompts WordPress to update or generate a new .htaccess file. Afterward, check if the internal server error is resolved.
If the error persists, ensure that WordPress successfully created or updated the .htaccess file. Sometimes, due to file and directory permissions, WordPress may not be able to write to the .htaccess file.
If necessary, you can manually replace the .htaccess file. First, log in to your website using FTP or the File Manager in your hosting account’s control panel. Locate the .htaccess file in the directory containing the wp-content, wp-admin, and wp-includes folders. Rename it to something like .htaccess_old to keep it as a backup without letting WordPress recognize it.
Next, create a new .htaccess file by right-clicking inside your site’s root folder and selecting the ‘Create new file’ option in your FTP client or File Manager. Name the new file .htaccess and save it.
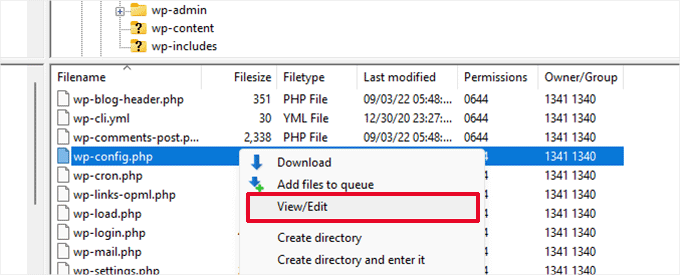
Since this file is empty, you’ll need to add the default WordPress rewrite rules. Right-click on the file, select ‘View/Edit,’ and paste the following code into the file:
Increasing the PHP Memory Limit
An internal server error can sometimes occur when a script exhausts the PHP memory limit.
To increase the PHP memory limit, you can edit the wp-config.php file. If you’re a beginner, proceed with caution, as even small mistakes in WordPress core files can cause significant issues.
Start by connecting to your WordPress website using an FTP client or the File Manager app in your hosting account’s control panel. Locate the wp-config.php file in the main folder of your website. Right-click on it and select ‘Download’ to create a backup in case something goes wrong.
Once you have a backup, right-click the file and choose ‘View/Edit.’ For more details, refer to our tutorial on increasing the PHP memory limit in WordPress.
Note: If setting the memory limit to 256M doesn’t resolve the issue, try increasing it to 512M.
If you encounter the internal server error only when attempting to log in to your WordPress admin area or while uploading an image, increase the memory limit by following these steps:
Create a blank text file on your computer and name it php.ini.
Add the following code: memory=256MB.
Save the file.
Upload it to your /wp-admin/ folder using FTP.
If increasing the memory limit resolves the issue, keep in mind that this is a temporary fix. You’ll need to identify the root cause that’s exhausting your memory limit, which could be a poorly coded plugin or a theme function. We recommend asking your WordPress hosting provider to check the server logs for precise diagnostics.
If increasing the PHP memory limit doesn’t solve the problem, further troubleshooting will be necessary.
Switch to a Default WordPress Theme
An internal server error might be caused by code within your WordPress theme.
To check if this is the issue, try switching to a default WordPress theme.
If you can access the WordPress admin area, navigate to the Appearance » Themes page. If a default theme is already installed, click the Activate button to switch to it. If not, click the Add New button at the top to install a default theme like Twenty Twenty-Three or Twenty Twenty-Two.
If you can’t access the admin area, you can still switch to a default theme using an FTP client. Connect to your website and go to the /wp-content/ folder. Right-click on the themes folder and download it to your computer as a backup. Then, delete the themes folder from your website and create a new, empty themes folder.
Next, visit the WordPress themes directory and download a default theme to your computer. The theme will be downloaded as a zip file. Unzip the file (Windows users can right-click and select ‘Extract All’; Mac users can double-click the file). You’ll now see a folder containing your theme.
Return to your FTP client or File Manager and upload the unzipped theme folder to the empty themes folder on your server. WordPress will automatically start using the default theme.
Check your website to see if this resolves the internal server error.
If this doesn’t fix the issue, you can re-upload your original WordPress themes from the backup or switch back to your previous theme.
If the error persists, don’t worry—there are still other steps you can take to resolve it.
Re-Uploading Core Files
If neither the plugin nor theme options resolved the internal server error, it may be worth re-uploading the /wp-admin/ and /wp-includes/ folders from a fresh WordPress installation.
This process will not affect your content or settings, but it could fix the issue if any files are corrupted.
To start, visit the WordPress.org website and click the ‘Download’ button to get the latest WordPress zip file.
Extract the zip file on your computer, and you’ll find a wordpress folder inside.
Next, connect to your WordPress website using an FTP client and navigate to the root directory. This is the folder containing the wp-admin, wp-includes, and wp-content folders.
In the left column of your FTP client, open the wordpress folder on your computer.
Select all the files within this folder and upload them to your website’s root directory. When prompted, choose ‘Overwrite,’ select ‘Always use this action,’ and check the ‘Apply to current queue only’ box.
Your FTP client will then replace the old WordPress files with fresh copies.
If any of your WordPress files were corrupted, this step should resolve the internal server error.
define( 'WP_DEBUG', true);
define( 'WP_DEBUG_LOG', true);
Ask Your Hosting Provider
If none of the methods resolve the internal server error on your website, it’s time to seek further assistance.
Contact your web hosting support team. They can review the server logs and identify the root cause of the error.