How to Easily Translate Your WordPress with TranslatePress
Step 1: Install TranslatePress in WordPress
To begin, install and activate the TranslatePress plugin. If you need assistance, refer to our step-by-step guide on how to install a WordPress plugin.
Once activated, go to the WordPress admin dashboard and navigate to Settings » TranslatePress.
Ensure you are on the ‘General’ tab, where you will configure the plugin settings.
Start by selecting your website’s default language from the ‘Default Language’ dropdown menu.
Next, select the language you want to translate your site into.
Go to the ‘All Languages’ section, and from the ‘Language’ dropdown menu, pick your desired language for translation.
After making your choice, click the ‘Add’ button each time to confirm your selection.
Next, scroll down to the ‘Native Language Name’ setting on the page.
Here, decide whether you want language names displayed in their native language or in English. Select ‘Yes’ or ‘No’ accordingly.
The following option lets you choose if you want to display the default language name in the URL as a subdirectory, such as http://example.com/en/.
We recommend keeping this setting as it is, as it benefits search engine optimization.
Next, navigate to the ‘Force language in custom links’ setting.
The default setting is ‘Yes,’ allowing the plugin to update custom links for translated languages, which enhances SEO.
In the subsequent option, decide if you want to use Google Translate for automatic translations.
The default choice is ‘No,’ but you can change it if you prefer to use Google Translate.
If you choose to use Google Translate, you will need to provide a Google Translate API key in the next step. Instructions on how to obtain this key are available via a link under the option.
Finally, you’ll see the options for displaying the language switcher on your website.
TranslatePress offers three choices: using a shortcode, adding a switcher to your navigation menu, or displaying a floating menu. Instructions on adding the language switcher to your website will be provided later in this article.
Now, click the ‘Save Changes’ button to store your settings.
Step 2: Translating Your Website Content
To begin translating your website, you have two options: click on the ‘Translate Site’ tab in the plugin’s settings page or select the ‘Translate Site’ button located in your WordPress admin bar.
Doing so will open the live translation editor in a new browser tab.
Simply click the blue translate icon next to any text on your website that you want to translate. TranslatePress will then automatically load the selected text into the left column of the translation editor.
Once the text is loaded in the column, you can add its translation in the box below and then click the ‘Save Translation’ button at the top to save your changes.
This process allows you to translate all the content on any page of your site, including navigation menus, buttons, sidebars, meta-text, widgets, and more.
With TranslatePress, you can also start translating any page or post on your site instantly when logged in.
Simply click the ‘Translate Page’ button at the top, and the live editor will open.
Step 3: Adding a Language Switcher to Your Website
After translating your website, the next step is to add a language switcher.
A language switcher allows users to select their preferred language when visiting your site, typically displaying each country’s flag to indicate the available languages.
TranslatePress provides multiple options for adding a language switcher: using a shortcode, as a navigation menu item, or as a floating banner.
The language switcher can be displayed as flags, language names, or both.
Adding a Language Switcher in WordPress Using Shortcode
To add a language switcher in WordPress using a shortcode, follow these steps:
Go to Settings » TranslatePress from your WordPress dashboard.
On the Settings page, scroll down to the General tab.
Copy the [language-switcher] shortcode from the Language Switcher section.
This shortcode can then be placed where you want the language switcher to appear on your website.
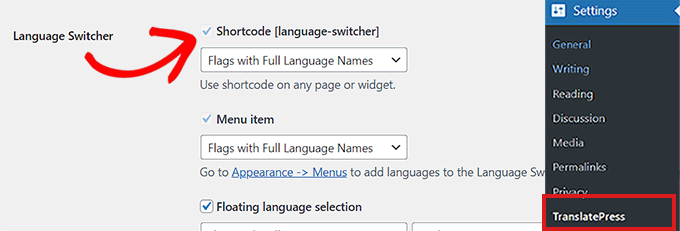
You can now insert this shortcode on any page, post, or sidebar widget to display the language switcher.
Here’s how the language switcher appeared on our demo site:
Adding a Language Switcher to Your WordPress Navigation Menu
To add a language switcher as a navigation menu item, go to the dashboard and navigate to Appearance » Menus.
Note: This method is not compatible with block-based themes that use a full site editor.
In the ‘Add Menu Items’ section on the left side of the screen, click on the ‘Language Switcher’ tab.
Check the languages you want to display in the language switcher, then click the ‘Add Menu’ button to include the language switcher as a menu item.
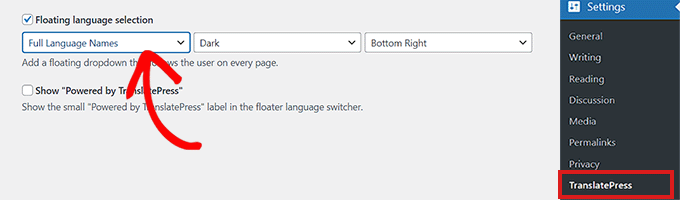
Adding a Floating Language Switcher
To add a floating language switcher, go to Settings » TranslatePress from the WordPress dashboard.
Scroll down to the ‘Language Switcher’ section in the ‘General’ tab. Check the box next to ‘Floating language selection’.
You can also adjust the position of the floating language switcher using the dropdown menu in the right corner of the screen.