How to Create Your Own Private Community with WordPress
Many of our readers have shared that they find large social media platforms exhausting, and it’s easy to see why.
There are few places where people can find niche communities that align with their interests without being overwhelmed by advertisements and manipulative tactics designed to keep them hooked.
This presents a significant opportunity for website owners.
Whether you sell products or services, offer online courses, or run a non-profit, you can easily build a community around your brand. Doing so can quickly enhance user engagement and loyalty.
In this guide, we’ll show you how to create your own private community with WordPress, set it up, and monetize it.

Here’s a quick overview of the topics covered in this guide:
- Why Create an Online Community with WordPress?
- Getting Started
- Setting Up BuddyBoss WordPress
- Community Platform
- Configuring BuddyBoss Settings
- Setting Up a Theme
- Monetizing Your Community with Subscriptions and Courses
- Adding Gamification to Boost Community Engagement
- Growing Your Community with a Mobile App
- Expanding Your Online Community
Why Create an Online Community with WordPress?
In our experience, creating an online community can significantly enhance user engagement and loyalty. Over the years, we’ve learned that highly engaged customers are more likely to make purchases and become vocal promoters of your brand.
An online community provides a space for users to interact, share ideas, and participate in discussions, fostering a sense of belonging and connection to your brand. These communities also offer valuable support and feedback, as members share knowledge, provide insights, and help each other. This dynamic environment increases retention and can create new revenue streams through membership fees and exclusive content.
Why Use WordPress?
There are many platforms for building communities, but WordPress offers unmatched freedom and extensibility. Here are the top reasons to choose WordPress:
Flexibility: With a vast array of themes and plugins, WordPress allows you to customize your community to fit your business model.
Cost-Effective: WordPress itself is free, with costs limited to hosting and any premium features you choose.
User-Friendly: Easy to use even for beginners, WordPress lets you manage content and settings without any coding knowledge.
SEO-Friendly: Built with SEO in mind, WordPress, along with plugins like All in One SEO, helps optimize your site for search engines.
If you’re new to WordPress, check out our detailed review with pros and cons.
Getting Started
To get started, you will need the following:
A domain name
A web hosting account
A WordPress community-building plugin
First, sign up for a web hosting account and register a domain name. Web hosting is where your website lives on the internet, while the domain name is the address users will type in to visit your online community.
Typically, a domain name costs $16 per year, and web hosting plans start at $7.99 per month, billed annually. However, our friends at Bluehost are offering WPBeginner users an exclusive discount and a free domain name. You can get started for just $1.99 per month.
Bluehost, one of the largest hosting companies globally, is also an officially recommended WordPress hosting provider.
To get started, visit the Bluehost website and click on the ‘Get Started Now’ button.

Follow the on-screen instructions to select a domain name and complete your purchase.
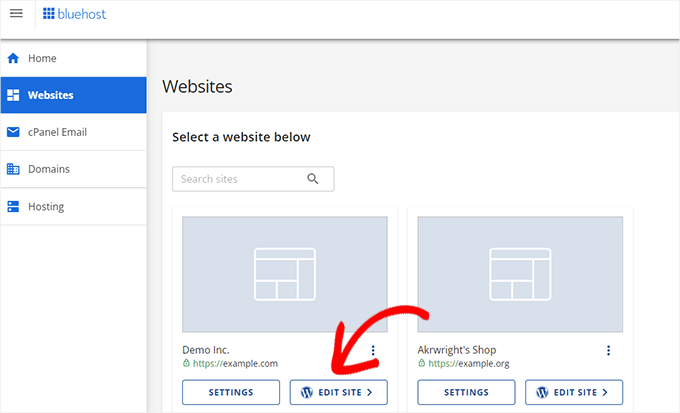
Once done, you can log in to your web hosting account dashboard.
Bluehost will automatically install WordPress for you. Simply click on the ‘Edit Site’ button to access the WordPress admin area.
Setting Up BuddyBoss WordPress Community Platform
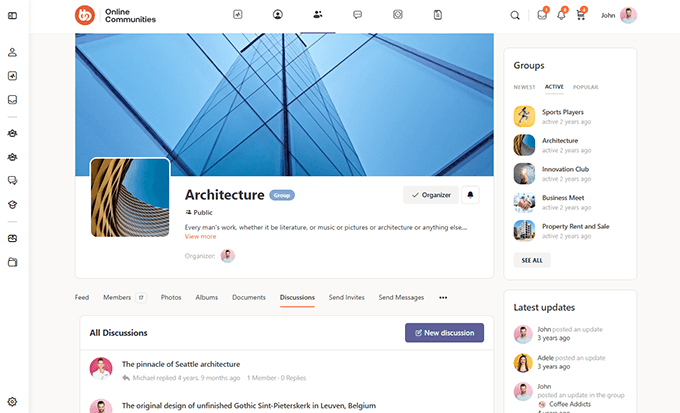
In this tutorial, we’ll use BuddyBoss to create an online community platform with WordPress.
BuddyBoss is the leading WordPress community-building platform, offering all the features needed to build an engaging community, including the ability to:
Transform your website into a social media platform.
Add forums, activity streams, and social groups to your site.
Enable users to connect and interact with each other.
Integrate with popular LMS and WordPress membership plugins.
And much more.
Here is an example of what an online community built with BuddyBoss might look like:nd social groups to your site.
Allow users to connect and interact with each other.
Integrate with popular LMS plugins and WordPress membership plugins.
And more.
For example, here is how an online community built with BuddyBoss could look like:
BuddyBoss also offers a free version. However, this free version has limited features, and you will need the paid version, BuddyBoss Pro, to take full advantage of the platform.
To get started, simply visit the BuddyBoss website to sign up.
After signing up, download and install both the BuddyBoss Platform and BuddyBoss Platform Pro plugins on your site. For detailed instructions, refer to our tutorial on installing a WordPress plugin.
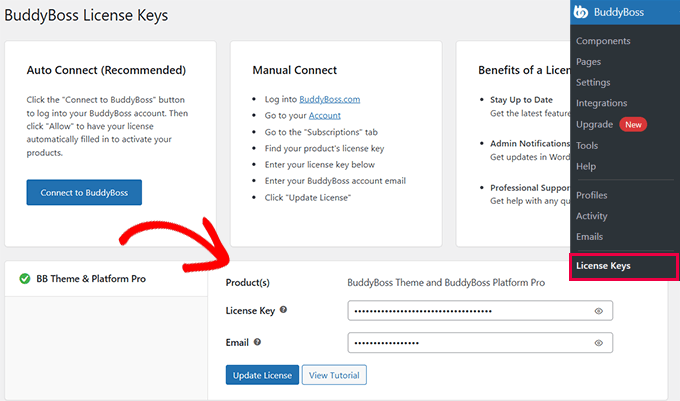
Once the plugins are activated, you’ll need to enter your product license key, which can be found in your account on the BuddyBoss website.
Configuring BuddyBoss Settings
After installing BuddyBoss, you need to configure the plugin according to your requirements.
Activate BuddyBoss Components
BuddyBoss offers a powerful set of features, each referred to as a Component. You can activate or deactivate these Components based on your needs.
To do this, navigate to the BuddyBoss » Components page. Here, you’ll find several components activated by default.
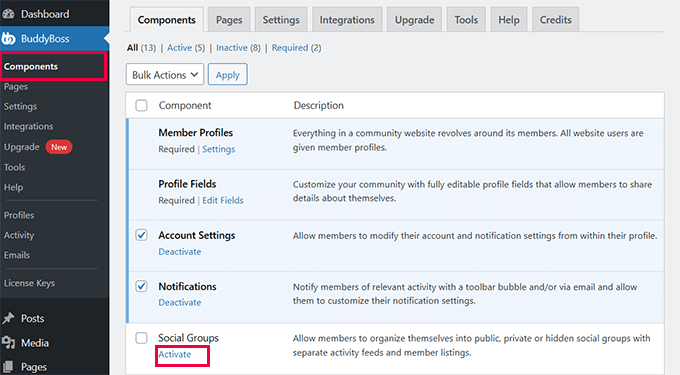
You will need to review the component list and activate any additional components you want to include on your site.
Here is a list of available components and their functions:
User Profiles: Allow members to create and customize their profiles.
Profile Fields: Customize your community with fully editable profile fields.
Account Settings: Enable members to modify their account and notification settings.
Notifications: Send notifications to members about relevant activities.
Social Groups: Allow the creation of social groups where members can join and interact.
Forums: Set up discussion forums for structured conversations.
Activity Feeds: Provide activity streams to track and display member activities.
Media Uploading: Enable members to upload and share photos, videos, and files.
Private Messaging: Allow members to send private messages to each other.
Member Connections: Enable members to connect with one another.
Email Invites: Allow members to send email invitations to non-members.
Moderation: Enable members to block each other and report inappropriate content.
Network Search: Allow members to search the entire network.
When you activate a component, you may see setup options just below the component title.
For example, under the ‘Profile Fields’ component, you will see the option to edit fields.
Setting Up a Theme
In WordPress, themes determine the visual appearance of your website for your users.
BuddyBoss is theme-agnostic, meaning it works well with any quality WordPress theme. However, an online community site requires a theme that effectively highlights your community and social features.
For instance, BuddyBoss offers a BuddyBoss theme specifically designed to leverage all the plugin’s features fully.
You can locate it under your account on the BuddyBoss website. It includes two separate themes: the main BuddyBoss theme and a child theme.
You’ll need to install both themes on your website and then activate the child theme. For instructions, refer to our tutorial on installing a child theme.
The BuddyBoss theme offers extensive customization options. To configure them, go to the BuddyBoss » Theme Options page.
Other Options:
BuddyBoss is built on BuddyPress, so you can use any BuddyPress themes for your site. Additionally, you can leverage page builder plugins like SeedProd or Thrive Architect to design custom pages tailored to your needs.
For more details, check out our guide on creating a custom WordPress theme.
Monetize Your Community with Subscriptions and Courses
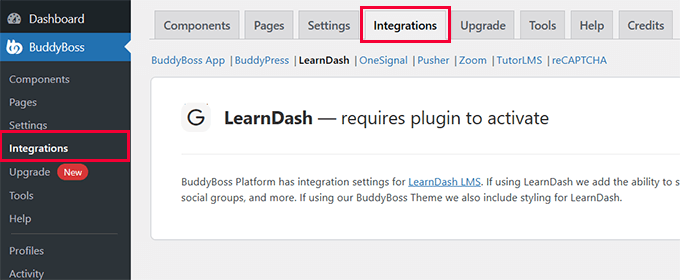
With BuddyPress, you can generate revenue from your online community through subscriptions, courses, premium content, and more. It integrates seamlessly with top WordPress LMS plugins such as LearnDash and LifterLMS, allowing you to create and monetize online courses directly on your community site.
You can also sell subscriptions using any WordPress membership plugin like MemberPress, Thrive Apprentice, and more.
Note: If you are using MemberPress, then you can install their BuddyPress addon to easily integrate with the BuddyBoss platform.
How Does Monetization Work?
BuddyBoss integrates with membership plugins to restrict access to exclusive content, manage payments, and offer subscription plans.
In addition, an LMS (Learning Management System) plugin allows you to create and manage courses and educational materials, handle student registrations, and more.
BuddyBoss enhances these features with online community and social media elements to further increase engagement.
Adding Gamification to Enhance Community Engagement
Online games are known for their high engagement levels and ability to foster a strong community spirit. Marketers apply similar game design principles to motivate and engage community members online.
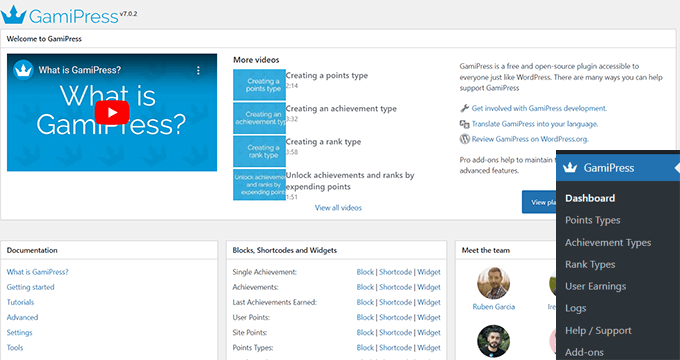
BuddyBoss utilizes the free GamiPress plugin to incorporate gamification into your community. This involves integrating point-based rewards, badges, and achievements to encourage more active participation.
To get started, simply install and activate the GamiPress plugin on your site.
This integration enables community managers to establish rules for earning points through activities like posting, commenting, or engaging with community events. Additionally, members can earn badges and achievements based on their participation, boosting motivation and overall engagement.
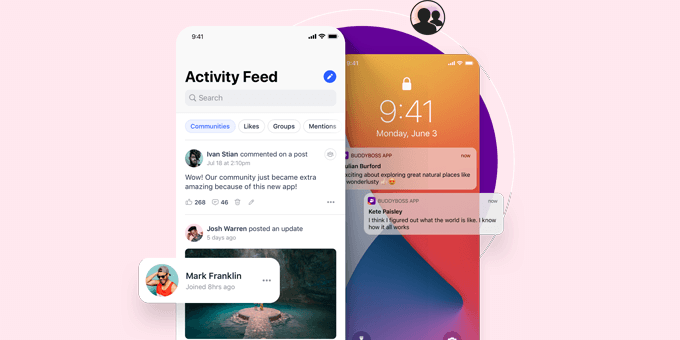
Grow Your Community With a Mobile App
Many users prefer accessing social media platforms through apps on their phones.
BuddyBoss provides a mobile app for both iOS and Android (available separately). This app allows your BuddyBoss community to stay connected and interact while on the move.
Users can easily access their online courses, post updates, and engage with course creators and fellow students. The app automatically syncs with your BuddyBoss web platform, ensuring users can access their profiles, courses, and interactions just as they would online.
Growing Your Online Community
With your online community set up, the next step is to focus on promoting and growing it.
Fortunately, WordPress and BuddyBoss offer powerful tools and plugins to support your growth efforts. Our team has tested various WordPress plugins that integrate seamlessly with BuddyBoss. Here are some top recommendations to help you build a thriving online community:
All in One SEO for WordPress: This leading SEO plugin allows you to easily optimize your WordPress community for improved search rankings and increased traffic.
SeedProd: A user-friendly drag-and-drop page builder that lets you create professional landing pages for your online community with ease.
WPForms: The top WordPress form builder plugin, enabling you to create and place custom forms anywhere on your site.
MonsterInsights: This plugin helps you track user activity within your community, providing analytics to make informed, data-driven decisions for growth.
We hope this guide has helped you understand how to build an online community with WordPress. You might also find our guide on generating $5000 in passive income each month useful, or explore resources on growing an online business with a limited budget.