How to Completely Uninstall and Delete W3 Total Cache Plugin Manually
How to Manually Uninstall the W3 Total Cache Plugin
W3 Total Cache is a widely used cache plugin for WordPress, known for its free accessibility and significant enhancement of website performance.
However, this plugin can sometimes lead to various issues, such as broken page errors, conflicts with other plugins, or even website crashes. Some hosting companies have even blacklisted the plugin due to potential security and performance concerns.
If you find that W3 Total Cache is causing problems rather than helping, it’s advisable to completely uninstall it. It’s crucial to delete all files created by the plugin to avoid further complications.
Here’s a step-by-step guide to properly uninstall the W3 Total Cache plugin and remove all associated files from your server.
Step 1: Clear All Plugin Caches
The first step is to clear all the caches created by the plugin. This can be easily done within the W3 Total Cache settings.
Log in to your WordPress dashboard.
At the top of the page, locate the “Performance” button.
Hover over the “Performance” button to reveal a new menu.
Click on the “Purge All Caches” option to clear all caches.
Refer to the screenshot below for further details.
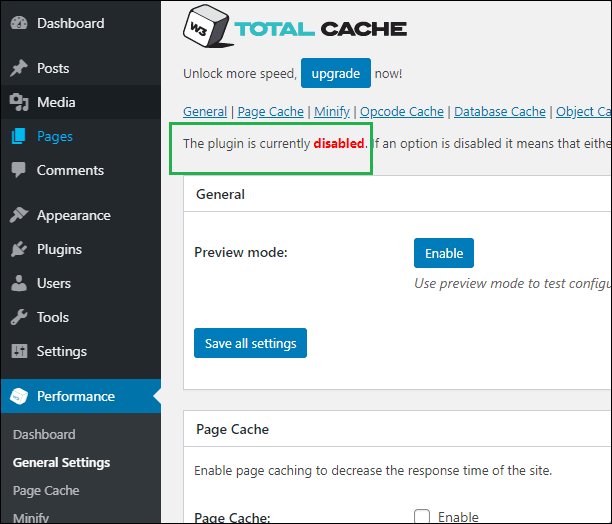
Step 2: Turn Off All Caching in General Settings
From your WordPress dashboard, navigate to the Performance menu and select General Settings.
In the General Settings, disable the following options:
Preview mode: Disable
Page Cache: Disable
Minify: Disable
Database Cache: Disable
Object Cache: Disable
Browser Cache: Disable
CDN: Disable
After disabling these options, click the Save all settings button. This will turn off all caching functionality on your site.
At the top of the General Settings page, you will see a message saying, “The plugin is currently disabled.”
Step 3: Deactivate and Delete the W3 Total Cache Plugin
Navigate to Plugins > Installed Plugins. Locate the W3 Total Cache plugin and deactivate it.

Once Deactivated, Delete this plugin.
Remove W3 Total Cache Files from WP-Content (if applicable)
Similar to other cache plugins, the W3 Total Cache plugin stores its data in the WP-Content folder.
To delete these files and folders, log in to your hosting cPanel account and navigate to the root directory of your WordPress installation.
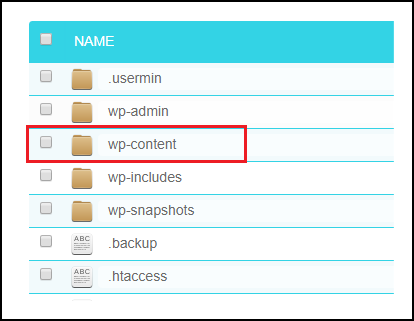
Next, locate the WP-Content folder and delete the following items:
W3 total-cache-config.php
advanced-cache.php
db.php
w3tc-config
The “cache” folder
Don’t worry if you don’t find all of these files.
Step 5: Check the .htaccess File
Finally, ensure that the W3 Total Cache plugin’s rules are no longer stored in the .htaccess file, which is located in the root directory.
Look for lines starting with # BEGIN W3TC [caching type] and ending with # END W3TC.
If these lines are present, carefully delete them and save the file.
Congratulations! You have successfully uninstalled the W3 Total Cache Plugin.